CONTAINER APPS · دليل اللوحة
ترحيل مشروع Docker متعدد الخدمات، من البداية للنهاية من اللوحة
هذا هو المرافق التفاعلي (point-and-click) لـدليل سطر الأوامر cdnctl. يأخذ نفس المشروع متعدد الخدمات بأسلوب docker-compose (خدمات ويب/API، عُمّال في الخلفية، قاعدة بيانات، ذاكرة تخزين مؤقت، وناقل رسائل) ويشغّله على منصة الحاويات المُدارة CDN.com.tr — بالكامل من لوحة الإدارة. لكل خطوة أدناه مكافئ في سطر الأوامر؛ استخدم ما تفضّله.
هل لديك بالفعل ملف docker-compose.yml؟ يمكن لتبويب الحاويات استيراده في خطوة واحدة — افتح Import from Docker Compose، راجع خطة المعاينة، وأكّد. راجع دليل استيراد Docker Compose أو مرجع cdnctl compose. تبقى الخطوات اليدوية أدناه سارية لأي شيء لا يغطيه استيراد compose.
1 · المفاهيم
- الحساب = المشروع. يمكن لحساب واحد أن يضم عدة تطبيقات حاوية؛ باقتك هي ما يحدد عدد التطبيقات التي يمكنك تشغيلها.
- التطبيق = صورة حاوية واحدة (خدمة). لكل تطبيق منفذ (port)، فحص سلامة (health check)، موارد، متغيرات بيئة وأسرار، ويمكن أن يتوسع إلى N نسخة (replicas).
- الإضافات المُدارة هي خلفيات ذات حالة (stateful) —
postgres(PostgreSQL/TimescaleDB) وmysqlوredisوnats(JetStream) — تربطها بتطبيق. يُحقن الاتصال (بما في ذلك كلمة المرور المُولَّدة) مباشرة في ذلك التطبيق؛ ولا تُعرض كلمة المرور مجددًا أبدًا. - اكتشاف الخدمات (Service discovery). تشترك التطبيقات في حسابك في شبكة خاصة وتصل إلى بعضها باسم التطبيق، تمامًا مثل خدمة docker-compose —
http://<app-name>:<port>. سمِّ تطبيقًاhot-data-storeعلى المنفذ8082وسيُحلhttp://hot-data-store:8082تلقائيًا. - النشر للعامة. يمكن نشر أي تطبيق على نطاق فرعي لـCDN.com.tr أو على نطاقك الخاص. تحصل كل خدمة منشورة على اسم مضيف (hostname) خاص بها؛ يبقى العُمّال (workers) وقواعد البيانات خاصة.
2 · افتح تبويب Container Apps
سجّل الدخول، افتح CDN Accounts، انقر على أيقونة الإعدادات في الحساب الذي تريد إدارته، ثم اختر تبويب Platforms. ستجد أنواع المنصات في الأعلى — اختر Container Apps (واضغط Activate في المرة الأولى).

تُفتح شاشة Container Apps على نظرة عامة (عدد التطبيقات، الإضافات، خروج الحافة (edge egress)) مع Create App وUsage Details، تليها قائمة Your apps. كل تطبيق صف يعرض حالته، مع إجراء Create Test Copy (preprod) ورابط Manage →. انقر على Manage لفتح صفحة التفاصيل الخاصة بذلك التطبيق، حيث تربط كل شيء بالخدمة.
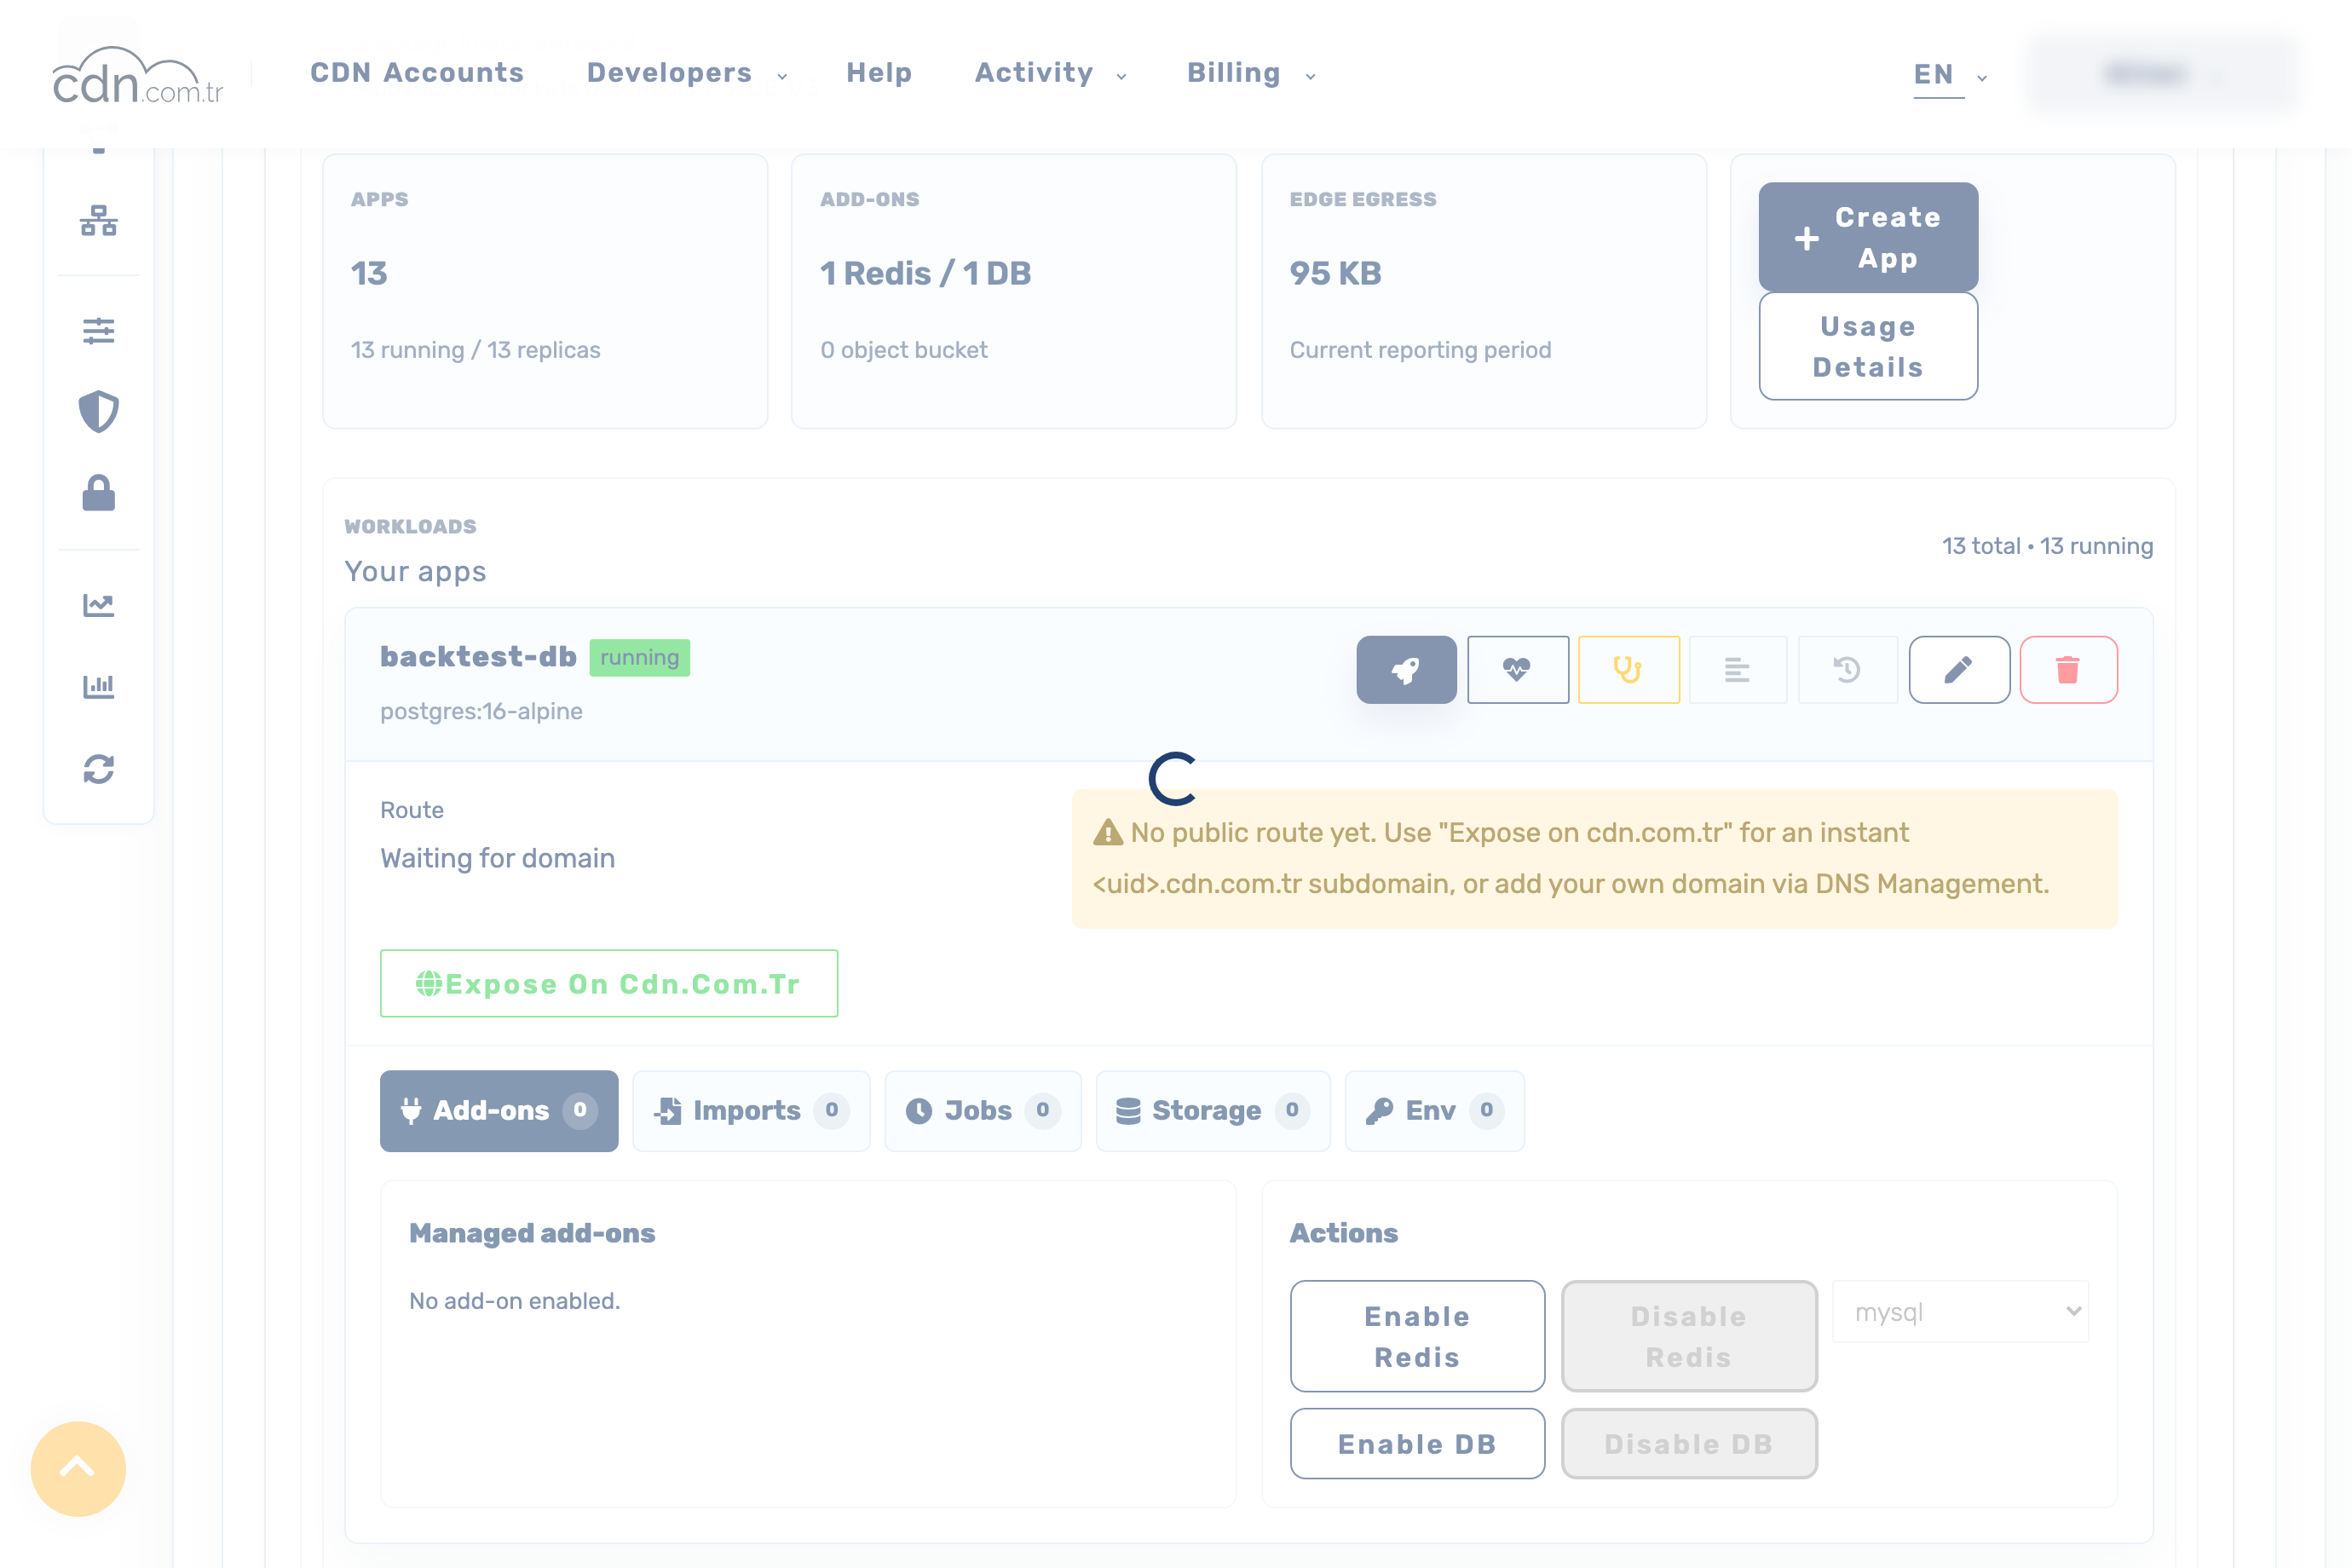
3 · أنشئ خدمة واربطها
انقر على Create App واملأ النموذج — تطبيق واحد لكل خدمة:
- اسم التطبيق — وهو أيضًا اسم المضيف داخل الشبكة الذي تستخدمه التطبيقات الأخرى (اجعله مطابقًا لاسم خدمة compose الخاصة بك).
- الصورة (Image) + الوسم (Tag) — ابنِ كل خدمة لـ
linux/amd64وادفعها إلى سجل يمكن للمنصة سحبه منه. - المنفذ (Port)، عدد النسخ (Replicas)، الخطة (Plan) ومسار فحص السلامة — اترك المنفذ فارغًا لعامل خلفية لا يستمع (listen).
- بيانات اعتماد السجل (Registry credential) — اختر بيانات اعتماد محفوظة للصور الخاصة، أو أضف واحدة مباشرة في صف Private registry credential (يُخزَّن الرمز مشفرًا ولا يُعرض مجددًا أبدًا).
- قيم البيئة (Env values) (سطر واحد
KEY=valueلكل قيمة) والأسرار (Secrets) — تُخزَّن الأسرار كأسرار Kubernetes مشفرة ولا تُعرض بعد الحفظ.
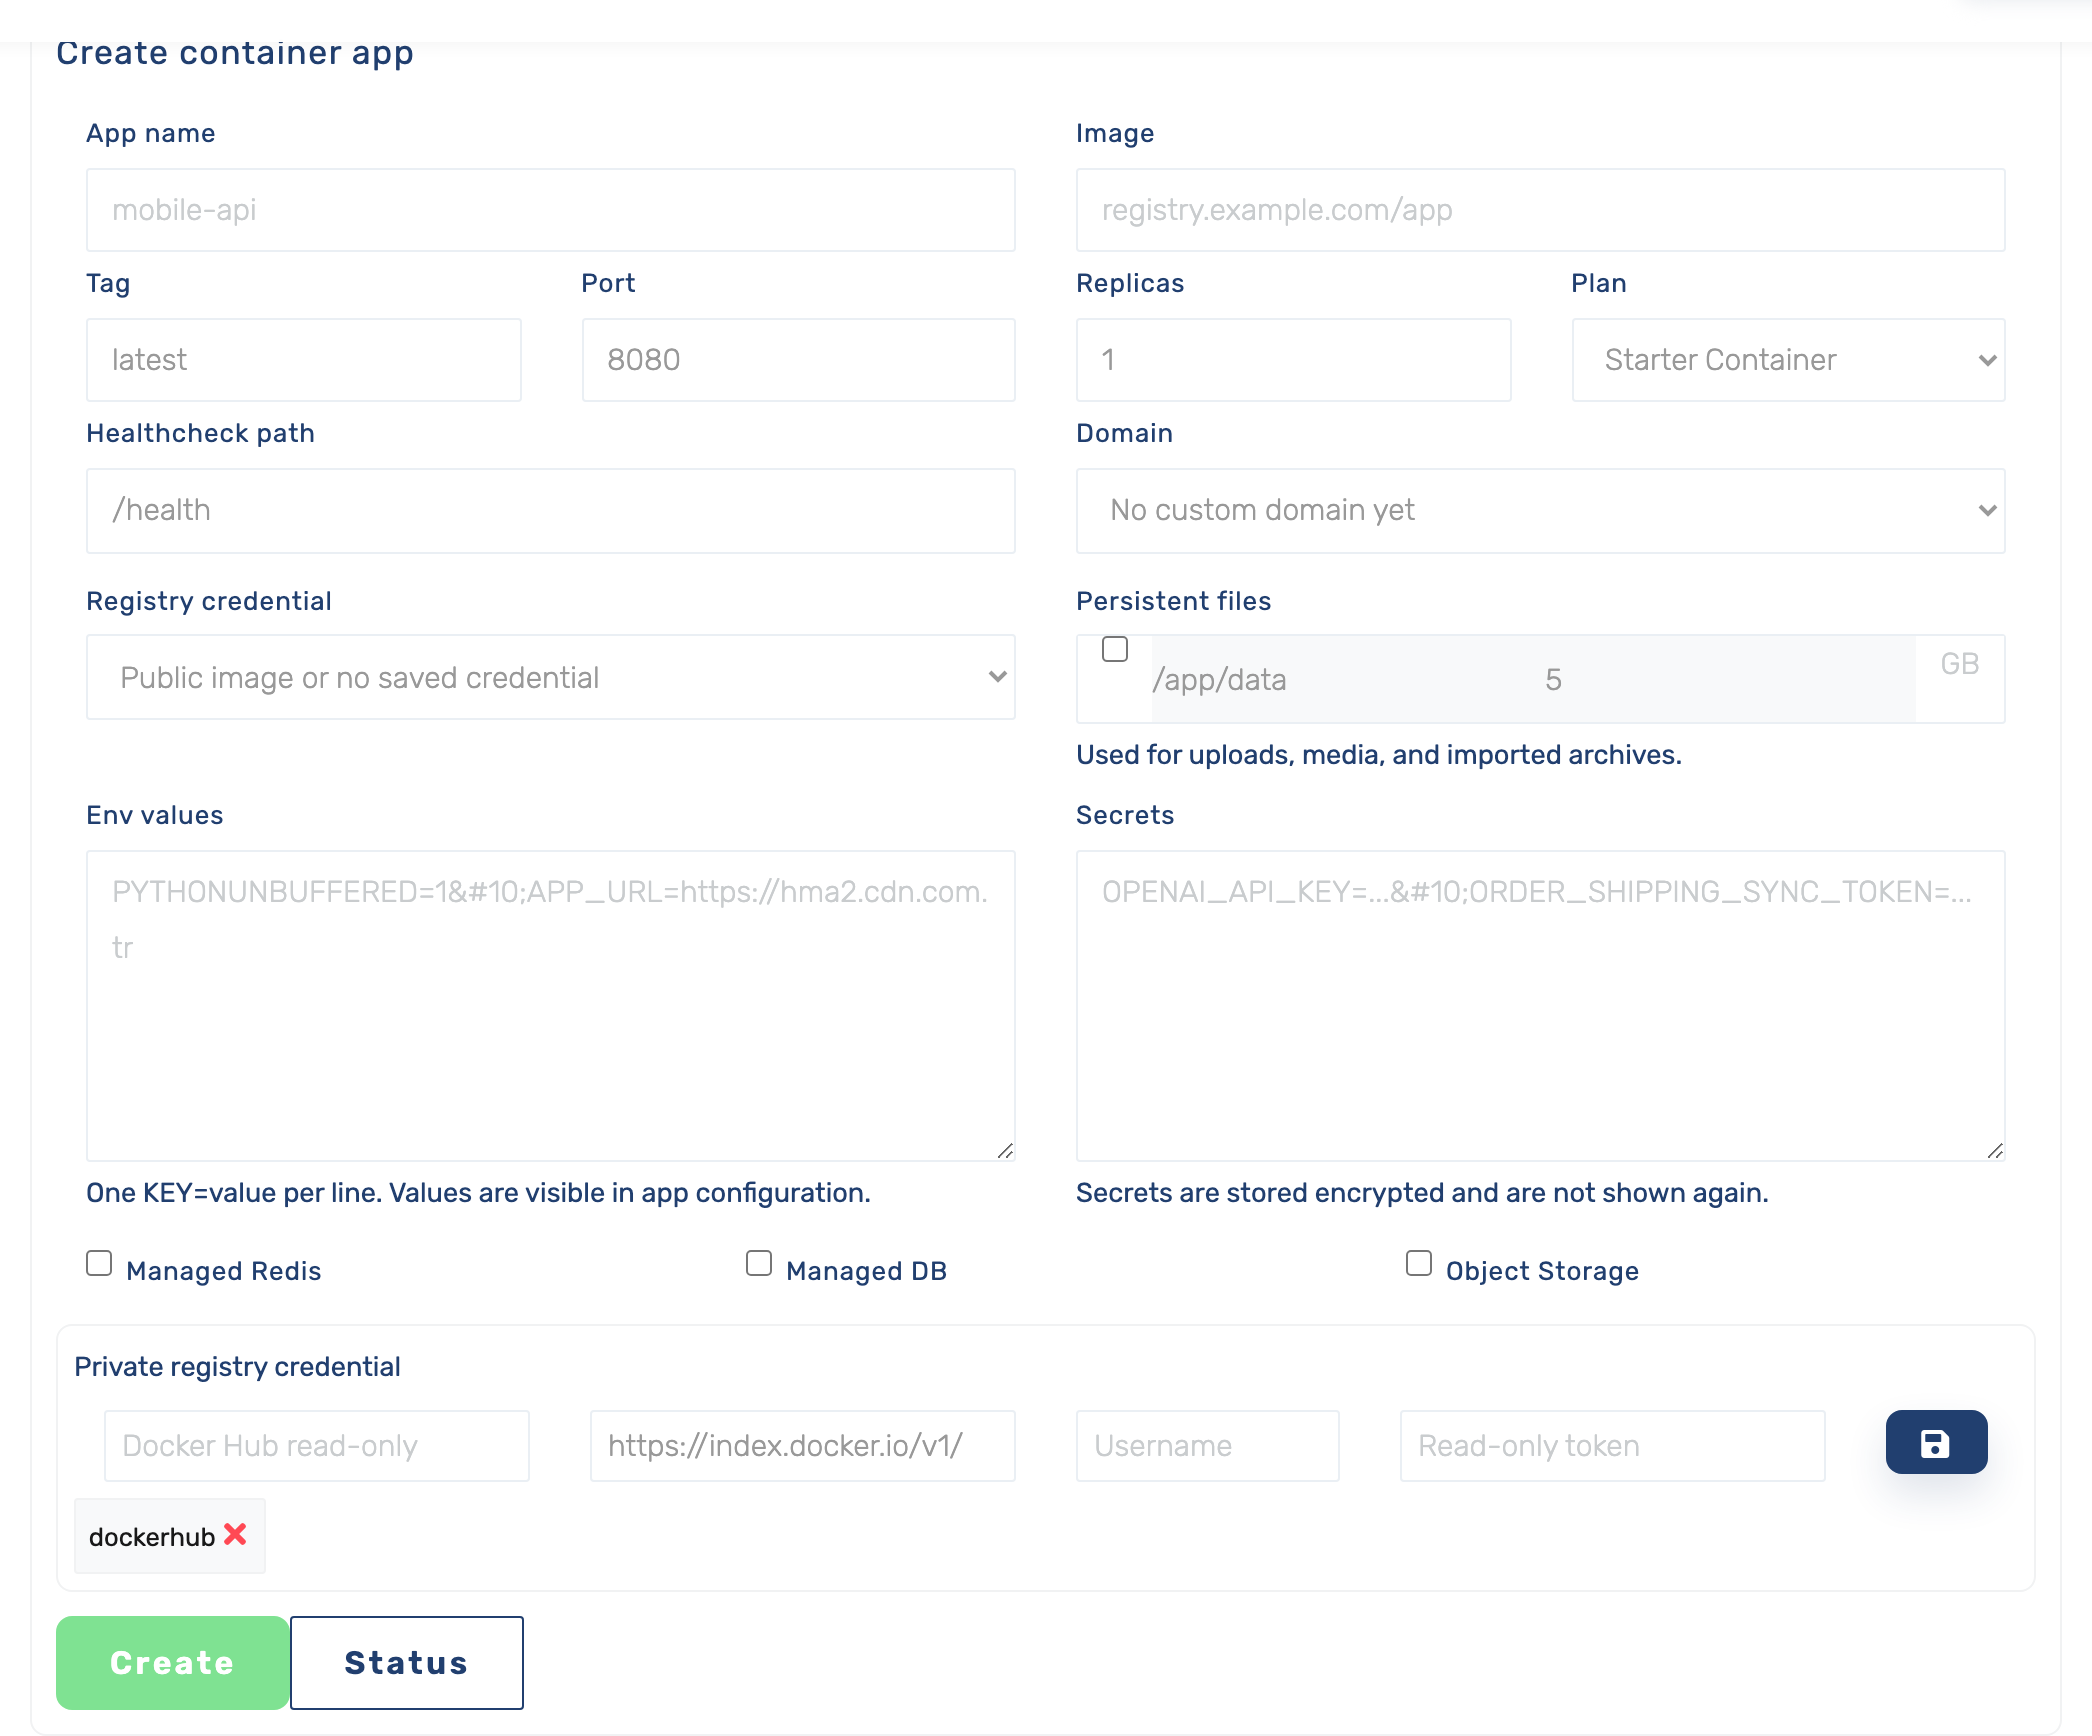
فعّل Managed Redis أو Managed DB أو Object Storage في النموذج لربطها أثناء إنشاء التطبيق، أو أضفها لاحقًا من صفحة تفاصيل التطبيق (الخطوة 4).
4 · أضف قواعد بيانات مُدارة، ذاكرة تخزين مؤقت وناقل رسائل
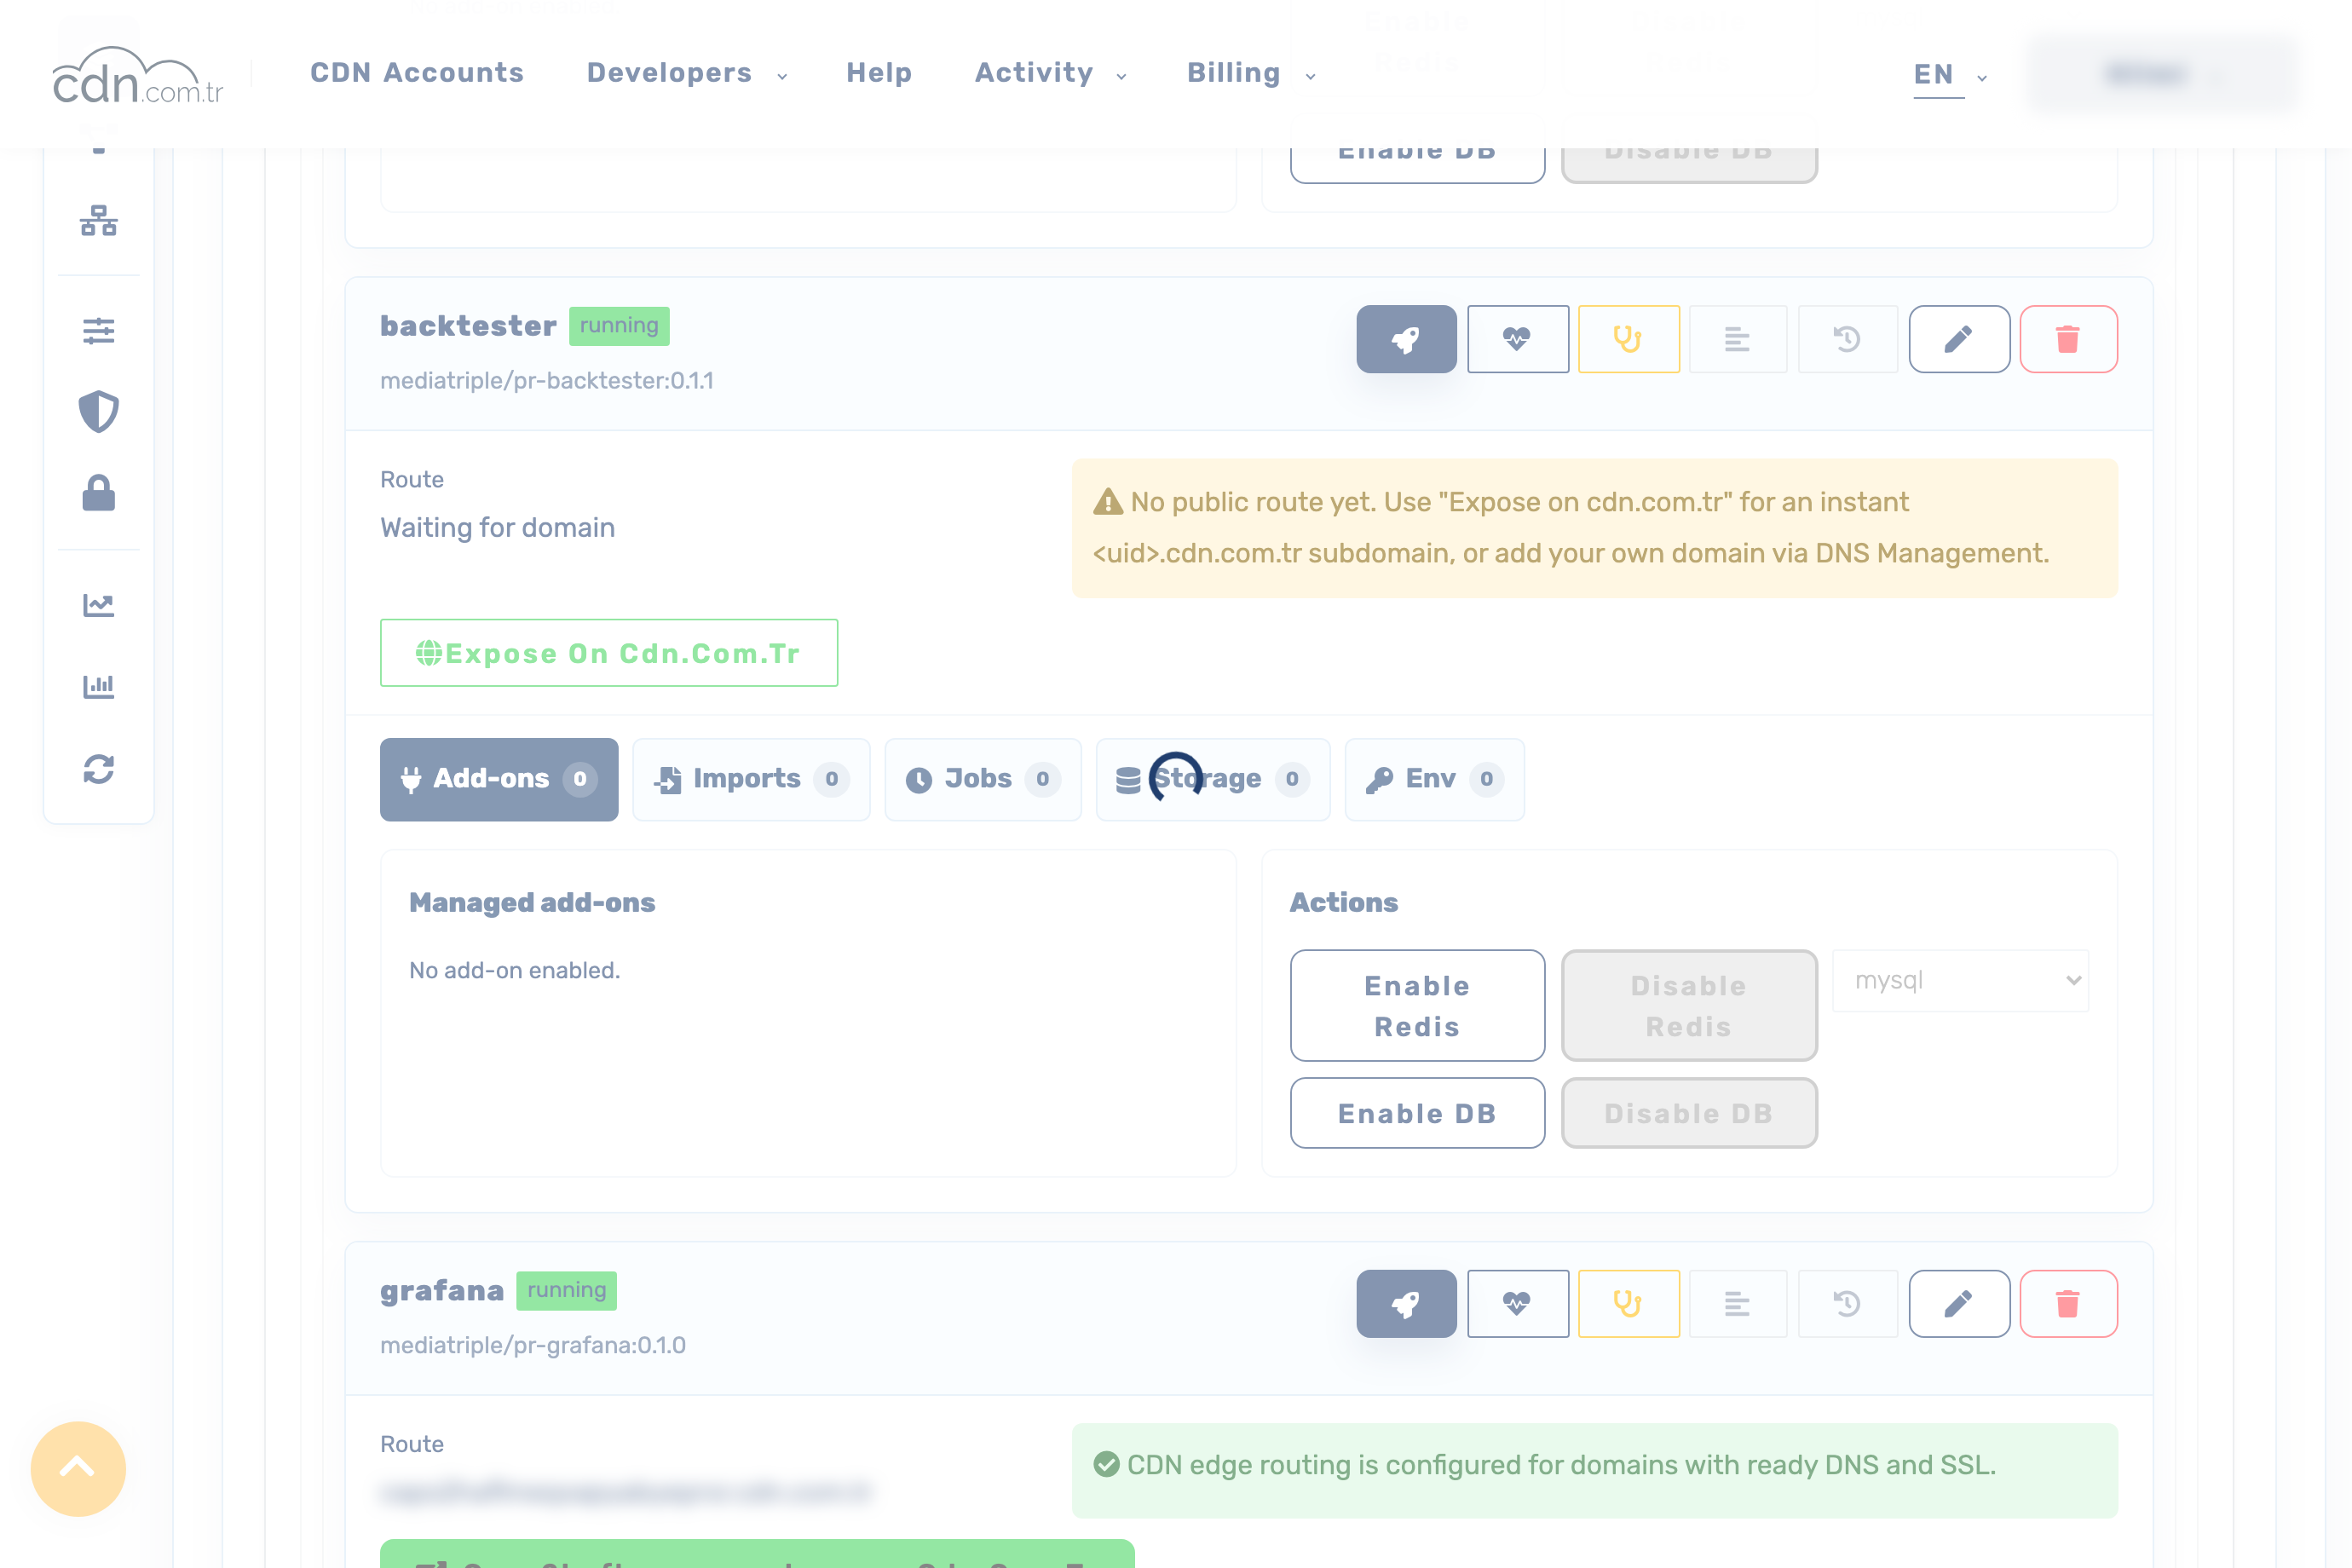
افتح التطبيق (Manage →)، ثم تبويب Add-ons الخاص به، واستخدم الإجراءات لتفعيل Redis أو قاعدة بيانات (PostgreSQL/MySQL) أو NATS. تُوفَّر الإضافة لذلك التطبيق ويُحقن اتصالها تلقائيًا:
# auto-injected into the app the addon is enabled on:
DATABASE_HOST, DATABASE_PORT, DATABASE_NAME, DATABASE_USER   # env
DATABASE_PASSWORD, DATABASE_URL                              # secrets (full postgres:// URL)
REDIS_URL        # redis://<redis-host>:6379/0
NATS_URL         # nats://<nats-host>:4222
مشاركة خلفية (backend) بين التطبيقات. يمكن الوصول إلى الخلفيات غير المحمية بكلمة مرور — NATS، وRedis كما هي مُعدة هنا — من تطبيقاتك الأخرى أيضًا: اضبط NATS_URL/REDIS_URL كمتغير بيئة في كل تطبيق مستهلك باستخدام مضيف الإضافة. أما قاعدة بيانات SQL المحمية بكلمة مرور فتُحقن فقط في التطبيق المالك لها (لا تُعرض كلمة المرور أبدًا)، فلا تحاول إعادة استخدامها من تطبيق ثانٍ — دع تطبيقًا واحدًا يملك قاعدة البيانات وتستدعيه التطبيقات الأخرى، أو شغّل صورة قاعدة بيانات خاصة بك بكلمة مرور تضبطها بنفسك.
5 · انشر، تحقق من الحالة والسجلات
حفظ تطبيق يضع عملية نشر في قائمة الانتظار. تنتقل شارة الحالة إلى running — في قائمة Your apps وفي صفحة تفاصيل التطبيق — عندما تكون الحاوية سليمة. في صفحة التفاصيل استخدم أزرار الإجراءات لعرض الحالة/بيئة التشغيل، السجلات والنشاط، وقائمة Operations (الشريط العلوي) لمتابعة كل عملية نشر حتى اكتمالها. انشر الخدمة التي تُهيئ مخطط قاعدة بياناتك أولاً إذا كانت تطبيقاتك تُشغّل عمليات ترحيل (migrations) عند الإقلاع.
يعكس عداد running / replicas في النظرة العامة، وترويسة Your apps، الحالة الحية — ينتقل التطبيق إلى running هناك بمجرد جاهزية الـpod.
6 · انشر الخدمات للعامة
في صفحة تفاصيل التطبيق، انقر على Expose on cdn.com.tr لتوليد نطاق فرعي ثابت وخاص بالتطبيق <uid>.cdn.com.tr (يُتولى HTTPS نيابة عنك). يعرض مسار التطبيق بعدها العنوان المباشر. انشر بقدر ما تحتاج من الخدمات — حساب واحد، أسماء مضيف عامة متعددة. لاستخدام نطاقك الخاص بدلاً من ذلك، أضفه عبر إدارة DNS ووجّهه إلى التطبيق.
انشر فقط الخدمات التي يجب أن تكون عامة. يبقى عُمّال الخلفية وقواعد البيانات خاصة. أضف مصادقة إلى أي خدمة HTTP تنشرها.
7 · قابلية الرصد (لوحة واحدة موحدة)
شغّل مجموعة أدوات المراقبة الخاصة بك كتطبيقات عادية: مُجمّع مقاييس (metrics collector) يفحص خدماتك (مبني مع إعداد الفحص (scrape config) مضمَّن فيه، ويبقى داخليًا) ولوحة معلومات تنشرها للعامة. أنشئ كليهما مثل أي تطبيق آخر (الخطوة 3)، اربط لوحة المعلومات بالمُجمّع باسم تطبيقه (http://<اسم-المُجمّع>:<المنفذ>)، ثم انشر (Expose) لوحة المعلومات فقط. تستعلم لوحة المعلومات من المُجمّع عبر الشبكة الخاصة ويمكن الوصول إليها على نطاقها الفرعي cdn.com.tr.
8 · التعديل، التوسيع، إعادة التشغيل والحذف
افتح تطبيقًا (Manage →)؛ تحمل صفحة تفاصيله هذه الإجراءات:
- تعديل (Edit) () — غيّر الصورة/الوسم، المنفذ، عدد النسخ، فحص السلامة، البيئة والأسرار، ثم أعد النشر.
- إعادة التشغيل والتوسيع — اضبط عدد النسخ على
0لإيقاف خدمة، وأعده إلى1+لبدء تشغيلها. - حذف (Delete) () — يزيل التطبيق و نطاقه الفرعي العام. تعطيل إضافة بيانات يحتفظ بقرصها افتراضيًا؛ حذف البيانات يتطلب تأكيدًا صريحًا.
تفضّل الطرفية؟ كل إجراء هنا يقابل تمامًا أمرًا واحدًا من cdnctl.