

Increasing your website’s speed and providing a faster experience for your users is essential, and CDN services are indispensable for achieving this. CDN.com.tr offers an easy and effective solution for this service. In this article, we will explain step-by-step how to add your website to CDN.com.tr.
Step 1: Sign Up for CDN.com.tr
Go to the Homepage: Visit the CDN.com.tr homepage.
Click on “15 Days Free Trial”: Click the “15 Days Free Trial” button to access the registration page.
Login Button: Alternatively, you can click the “LOGIN” button at the top right of the registration page.
Enter Your Details: Fill in your email and password information to create your account.
Complete Registration: Complete the registration process by following the necessary verification steps.
Step 2: Add Your Website
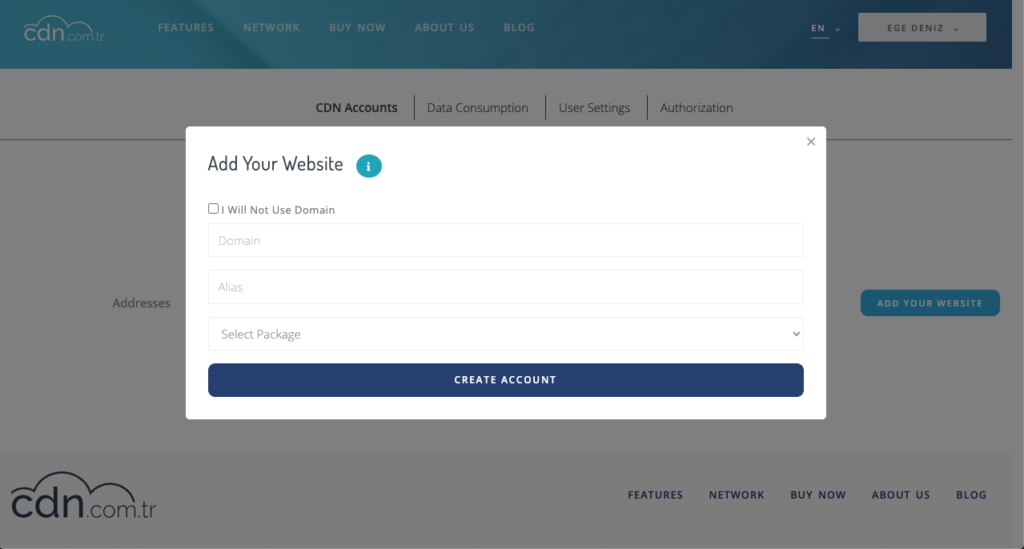
Go to CDN Accounts Section: After creating your account, navigate to the “CDN Accounts” section.
Add Your Website: Click on the “Add Your Website” button and fill in the following information on the screen that appears:
- Domain Name: Enter the domain name for which you want to use the CDN service.
- Nickname: Enter a name to easily remember this service.
Select Free Plan: Since you will be using the 15-day free package, select the “Free” option and click the “Create Account” button.
Step 3: Verify Your Website
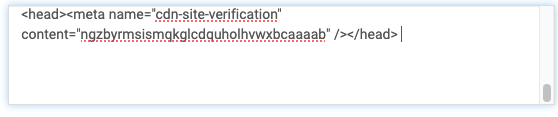
Get the Code: CDN.com.tr will provide you with a code to verify your website.
Insert the Code: Copy this code and paste it between the <head> tags of your website.
Verify the Site: Return to CDN.com.tr, click the “Verify Site” button, and ensure that your site is verified.
Step 4: Configure CDN Settings
Go to Settings: After creating your CDN account, click the settings button of the account you created in the CDN accounts section to go to the detailed settings section.
Pull CDN Settings:
- Domain Name: Enter your website’s domain name.
- Origin Address: Enter your server’s origin address.
- Origin HTTPS Port: Enter the port number used for HTTPS.
- HTTP Port: Enter the port number used for HTTP.
Activate: Click the “Activate” button after filling in this information.
Distribution Settings:
- Cached Site Address: Under the simple transfer section, you can see the address served by CDN.com.tr for your cached site.
- Apply All Changes: After clicking the “Activate” button, click the “Apply All Changes” button at the top.
Step 5: Using Your Own Domain with CNAME Redirect (Optional)
Enable CNAME: If you want the CDN to work under your own domain, check the “CNAME” option next to the simple transfer.
TXT Settings: Make the necessary TXT settings to allow the CDN to work under your own domain. This step provides a more professional appearance.
Conclusion
CDN.com.tr offers an effective CDN solution to enhance your website’s performance. By following the steps above, you can easily add your website to CDN.com.tr and provide your users with a faster and smoother experience. For more details and visual instructions, you can watch our video guide..